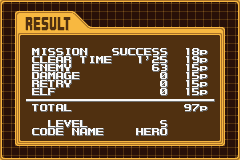
Result screen from Mega Man Zero.
The Result (リザルト) screen is a feature from the Mega Man Zero series that shows how well the player performed in a mission.
Result screen criteria
- Mission (ミッション) - Shows how well Zero did in the mission's objectives, such as protecting Ciel, saving Resistance members, or destroying certain objects in the area. If there are no other objectives besides completing the stage, this criterium will always have the highest score, 20 points.
- Clear time (クリアタイム) - How long it took to complete the mission. Every mission has a specific time to obtain the highest score, 20 points. In the first Mega Man Zero game, the timer only stops when the Result screen is shown, not when the message "Mission Completed" appears.
- Enemy (エネミーカウント "enemy count") - The number of enemies destroyed by Zero. Every mission has a specific amount of enemies to be killed to receive the highest score, 15 points.
- Damage (ダメージ) - The damage Zero received during the mission. The smaller amount of times Zero is hit, the higher the score, with a maximum of 15 points in the first three games and 20 points in Mega Man Zero 4.
- Retry (リトライ) - This criterium starts with 15 points, and is reduced every time Zero dies and the player uses a continue.
- Weather (ウェザーレベル "weather level") - Only used in Mega Man Zero 4. The player obtains 10 points for completing the mission with the normal weather, and none for using a weather that will make the boss easier.
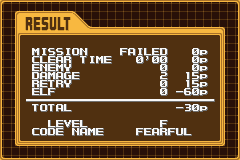
Result screen from Mega Man Zero 1 with negative score.
- Elf (エルフ) - Cyber-elves used in the game. This criterium starts with 15 points in the first three games, which is reduced every time a Cyber-elf is used. Cyber-elves with permanent effects will always reduce the points, being possible to have high negative points. Satellite Cyber-elves from Mega Man Zero 3 don't affect the score. In Mega Man Zero 4 this criterium has 0 points, and becomes negative if Zero uses the Cyber-elf's ability beyond its max. level.
- Total (トータル) - The total amount of points, the highest amount being 100 points.
- Average (アベレージ) - Added in Mega Man Zero 3. The average total amount of points between missions.
Level
Level (レベル) is the player's rank based on his score in the mission, similar to the Mega Man X series' Hunter Rank. The lowest level is "F", given when the mission failed or the performance was poor. The highest levels are "A" and "S", which are required to Zero obtain the boss' EX Skill in Mega Man Zero 2 and Mega Man Zero 3.
Code Name
In the end, the player receives a Code Name (コードネーム) that varies depending of his performance.
Position: in the first game the code name is always a single word ("solo"), while in the second game onward it is composed of two parts, with some exceptions like "Hero" and "Savior"; the first part is related to the result screen criteria, while the second is for the weapons used.
Below is a list of code names in the series:
Note: Most of the code names below are translations of Japanese names. Some code names have different English translation, and may include differences between the games.
| Code name | Games | Requirement | Position |
|---|---|---|---|
| Game start | |||
| Hunter (ハンター) | MMZ 1 | Zero's starting code name in MMZ1. | Solo |
| Warrior (センシ Senshi) | All | Zero's starting code name in MMZ 2 to MMZ 4. Received when no weapon is used more than others. | Solo (MMZ1 and in the beginning of MMZ 2-4) Second half (when obtained in MMZ 2-4) |
| Mission related | |||
| Speedster (MMZ) Lightning (MMZ 2-4) (ハヤテ, "Hayate" in Japan) |
All | Clear Time = 10 points or higher (MMZ1). Clear Time between 19-20 points (MMZ 2). Clear Time between 18-19 points (MMZ 3-4). |
Solo (MMZ) First half (MMZ 2-4) |
| Godspeed (イダテン, "Idaten" in Japan) | MMZ 3-4 | Clear Time = 20 points. | First half |
| Slowpoke (ウスノロ Usunoro) | MMZ 1 | Clear Time = 0 points. | Solo |
| Sluggish (ドンソク Donsoku) | MMZ 2-4 | Clear Time = 0 points. | First half |
| Flawless (カンゼンシュギ Kanzenshugi) | MMZ 2-4 | Mission = 20 points. | First half |
| ? (ハンギャク Hangyaku) | MMZ 2 | Mission = 0 points. | First half |
| ? (ウラギリ Uragiri, "Traitor") | MMZ 3-4 | Mission = 0 points. | First half |
| ? (フジミ Fujimi) | MMZ 2-4 | Retry = 15 points. | First half |
| Fearful (マケイヌ Makeinu) | MMZ 1 | Give up from a mission. | Solo |
| Buggy (ゼンマイジカケ Zenmaijikake) | MMZ 1 | Clear a mission with Level F. | Solo |
| Lazy (オンボロ Onboro, "Worn-out") | MMZ 1 | Clear three missions in a row with Level F. | Solo |
| Scrapper (テツクズ Tetsukuzu, "Scrap Iron") | MMZ 1 | Clear five missions in a row with Level F. | Solo |
| Crasher (ムノウ Munou, "Incompetent") | MMZ 1 | Clear seven missions in a row with Level F. | Solo |
| Hero (ユウシャ Yuusha, lit. "Hero", "Man of Valor") | All | Obtain level S. | Solo |
| Superhero (MMZ) Valiant (MMZ 2-3) Legend (MMZ 4) (エイユウ Eiyuu, lit. "Hero", "Great Man") |
All | Obtain level S in three missions in a row. | Solo |
| Savior (キュウセイシュ Kyuuseishu) | All | Obtain level S in five missions in a row. | Solo |
| Immortal (MMZ) Redeemer (MMZ 2-4) (ゴッド, "God" in Japan) |
All | Obtain level S in seven missions in a row. | Solo |
| Master (マスター) | MMZ 1 | Complete the game in Hard Mode. | Solo |
| ? (コマ Koma) | MMZ 4 | Weather Level = 10 points. | First half |
| Calm (レイセイ Reisei) | MMZ 4 | Weather Level = 0 points. | First half |
| Buster Shot related | |||
| Gunman (ガンマン) | MMZ 2-4 | The Buster Shot is used over 70% more times than other weapons during the mission. | Second half |
| Shooter (シューター) | MMZ 2-4 | The Buster Shot is used over 70% of the time for three consecutive missions. | Second half |
| Sniper (スナイパー) | All | The Buster Shot is used more than other weapons during the mission (MMZ1). The Buster Shot is used over 70% of the time for five consecutive missions (MMZ 2-4). |
Solo (MMZ) Second half (MMZ 2-4) |
| Z Saber related | |||
| Slayer (ケンゴウ Kengou, "Master Fencer") | MMZ 1 | The Z Saber is used more than other weapons during the mission. | Solo |
| Edge (ケンシ Kenshi) | MMZ 2-4 | The Z Saber is used over 70% more times than other weapons during the mission. | Second half |
| Edgeboy (ケンキャク Kenkyaku) | MMZ 2-4 | The Z Saber is used over 70% of the time for three consecutive missions. | Second half |
| Edgeman (ケンセイ Kensei) | MMZ 2-4 | The Z Saber is used over 70% of the time for five consecutive missions. | Second half |
| Shield Boomerang related | | |||
| Ripper (リッパー) | MMZ 3 | Shield Boomerang is used over 70% more times than other weapons during the mission. | Second half |
| Slasher (スラッシャー) | MMZ 3 | Shield Boomerang is used over 70% of the time for three consecutive missions. | Second half |
| Shield Master (シールドマスター) | MMZ 3 | Shield Boomerang is used over 70% of the time for five consecutive missions. | Second half |
| Rod related | |||
| Chain Man (チェーンマン) | MMZ 2 | Chain Rod is used over 70% more times than other weapons during the mission. | Second half |
| Chain Dancer (チェーンダンサー) | MMZ 2 | Chain Rod is used over 70% of the time for three consecutive missions. | Second half |
| Chain Master (チェーンマスター) | MMZ 2 | Chain Rod is used over 70% of the time for five consecutive missions. | Second half |
| Stabber (スタッバー) | MMZ 3 | Recoil Rod is used over 70% more times than other weapons during the mission. | Second half |
| Penetrator (ペネトレーター) | MMZ 3 | Recoil Rod is used over 70% of the time for three consecutive missions. | Second half |
| Rod Master (ロッドマスター) | MMZ 3 | Recoil Rod is used over 70% of the time for five consecutive missions. | Second half |
| Zero Knuckle related | |||
| Ironfist (アイアンフィスト) | MMZ 4 | The Zero Knuckle is used over 70% more times than other weapons during the mission. | Second half |
| Brawler (ブラストフィスト, "Blast Fist") | MMZ 4 | The Zero Knuckle is used over 70% of the time for three consecutive missions. | Second half |
| Boxer (マスターフィスト, "Master Fist") | MMZ 4 | The Zero Knuckle is used over 70% of the time for five consecutive missions. | Second half |
| Armsman (ウェポンマスター, "Weapon Master") | MMZ 4 | Use all weapons available for the Zero Knuckle. | Second half |
| Enemy related | |||
| Destroyer (ハカイシン Hakaishin) | MMZ 1 | Amount of enemies destroyed is twice the required for the highest Enemy score. | Solo |
| Pacifist (ヘイワシュギ Heiwashugi) | MMZ 1 | Mission cleared with low Enemy score. | Solo |
| Flawless (ムキズ Mukizu) | MMZ 2-4 | Damage score = 14 or higher (MMZ 2-3). Damage score = 19-20 points (MMZ 4). |
First half |
| Wounded (キズダラケ Kizudarake) | MMZ 2-4 | Damage score = 5 points or less. | First half |
| ? (ヒジョウ Hijou) | MMZ 2 | ? | First half |
| ? (レイケツ Reiketsu) | MMZ 3-4 | Enemies destroyed in the mission is twice or more than the amount required for the highest Enemy score. | First half |
| Cyber-elf and Secret Disk related | |||
| Elf (エルフ) | MMZ 2-3 | The first half of code names ending with "Collector", "Breeder", or "Killer". | First half |
| Disk (ディスク) | MMZ 3 | Collect all Secret Disks. Is followed by "Collector". | First half |
| Collector (コレクター) | MMZ 1-3 | Collect all Cyber-elves (Jackson isn't required in MMZ1). | Solo (MMZ) Second half (MMZ 2-3) |
| Breeder (ブリーダー) | MMZ 2-3 | Raise all Cyber-elves. | Second half |
| Killer (キラー) | MMZ 2-3 | Elf score is -30 or lower. | Second half |
| Master (マスター) | MMZ 2 | Collect and use all Cyber-elves. | Second half |
| ? (タリキホンガン Tarikihongan) | MMZ 4 | ? | First half |
Screenshots
")
")
")
| Mega Man Zero series | |
|---|---|
| Main characters | |
| Zero • Ciel • Cerveau • Alouette • X • Elpizo • Crea and Prea • Dark Elf • Neige Sage Harpuia • Fighting Fefnir • Fairy Leviathan • Hidden Phantom • Copy X • Dr. Weil • Omega • Craft Resistance • Caravan • Four Guardians • Eight Gentle Judges • Einherjar Eight Warriors | |
| Games | |
| Mega Man Zero • 2 • 3 • 4 • Collection • Legacy Collection | |
| Scripts | |
| Mega Man Zero • 2 • 3 • 4 | |
| Related Items | |
| Zero's weaponry • Chips • Cyber-elf (List) • EX Skill • Energy Crystal • Item Box • Secret Disk Locations (Neo Arcadia • Resistance Base • Area Zero • Ragnarok) • Pantheon (List) • Bosses(Mutos Reploid) • Golem • Armed Phenomenon • Variant Mega Man Zero Official Complete Works • RTRZ-Telos Drama Track Translations • Remastered Tracks Rockman Zero Rockman Zero (manga) • Vile's Incident: Eden dome, its sin and rebirth | |