| This article is a stub from the Mega Man series. You can help by expanding it, adding pictures, and improving existing text. |
Walkthrough of Mega Man 7.
Opening Stage[]
The city is wrecked by Dr. Wily's robots. This stage is simple, from the start, head right, defeating the Mets and the Bunby Tanks until you get to the robot that destroyed the city in the intro, a giant steamroller robot named the Mad Grinder. This guy looks imposing, but he's really easy. Avoid his boomerang blade, jump when he slams the ground, and keep hitting him in the head with Charge Shots until he's defeated. After he's defeated, head right, past the wreckage of Bunby Tanks, Properides, and Mets until you get your first fight with Bass. He's really easy. He just shoots at you, and sometimes jumps. Hit him until he talks a bit, then teleports out.
First four Robot Masters[]
Bomb, Bomber, Bombest: Burst Man[]

Burst Man's stage
From the start, head right, jumping on the Count Bombs, but jumping when they reach 0. Next, jump on the 3 Count Bombs, then making sure to stay away from them before the countdown reaches 0. Drop down and get the E-tank by exploding more Count Bombs. There are two 1UPs that are pretty out of reach, you can get them later. During the spike hallways, keep calm and only hold jump for as long as you need to. The swimming Mets can be defeated with clever positioning.
After this you will fight a lobster miniboss. This boss can be quick-killed with Junk Shield, but is actually pretty fun to fight Buster only. On death, it will make the substance turn purple and start to rise, taking you with it. Try to stay away from the bombs. The next section brings back everybody's favorite gimmick objects. Thankfully in this level they're not that bad. After that, the purple substance returns. There are a bunch of extra items to get here, including the U plate. Get them.
Don't Slip!: Freeze Man[]
Freeze Man's stage
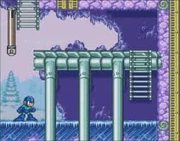
From the start, head right and defeat the Petaforth. Head up the ladders to face a polar bear enemy that attacks with ice spheres. This enemy legitimately has more HP than a boss so it will take a while to kill. If you have them, Junk Shield and Thunder Bolt can deal with them since they lack invincibility frames. Defeat it and head right, jumping over the spike pit. Defeat the Shield Attacker and head up the ladder into the actual dig site. Use the icicles dropped from the Icicle Tecks as platforms to cross the spike pits. Defeat the Shield Attacker and use Rush Coil to reach the top ladder. In this room, jump up the ice platforms before they shatter and collect the "H" plate.
Now go down and meet an old "friend", Sniper Joe. Defeat him when he's not guarding. Go down and head right. Head across the top platforms to collect the Rush Search, now drop down and head right, ignoring the Spiral Gabyoalls and the Driver Cannons. You'll find another Polar Bear. This one has a new attack, it rains icicles down from the ceiling. Thankfully you can skip this one, but if you have one of the effective weapons, destroy it and take its E-Tank. Climb up the ladder and you'll find a new enemy: Bombsleds. Defeat them. Before you enter the gate, use Rush Search on a ledge to find an Exit Unit. This allows you to leave levels and keep everything you have, granted you already beat them. Now head through the gates.
You'll find Freeze Man in some ice. He'll break out. Freeze Man has two attacks. His first one is called Freeze Cracker, where he fires a large snowflake at Mega Man. Beware, as it freezes him in ice for a short time. His other attack is called Freeze Rain, where he makes icicles fall from the ceiling. It can cause Mega Man to stop moving for a bit. Pummel him with Charge Shots until he's defeated. This is actually safer than his actual weakness, Junk Shield, as it doesn't require melee or getting lucky.
Watch Your Step!: Cloud Man[]
This stage contains many precarious jumps, use Rush Coil if you doubt your ability. There is no way to get around shooting the Tel Tel unless you already have the Super Adapter, and the rain starts on the next screen anyway so no matter. There is a 1UP on the ledge that can be accessed with Rush Coil. The second Tel Tel only responds to being shot with Freeze Cracker, shoot it with it if you can as it makes a later section easier.
On re-runs of the stage, do not shoot Thunder Bolt in the part with the cloud platforms, for some reason there's a unique interaction where it becomes electric. The next section is the one where the snow helps as the platforms will be revealed, otherwise they are invisible. Use Rush Coil to reach an area with a 1UP and the U plate off to the side. The Copipis here are a good way to farm for drops with Junk Shield. There is also a high jump to a ladder that you can make with Rush Coil, where you will meet a certain someone.
Cloud Man is an extremely annoying boss. When you battle Cloud Man, if you have it, use the Danger Wrap to wrap Cloud Man in the bubble. Cloud Man will fall down, become invincible, and float up for a lightning attack. Jump and shoot him again, and repeat that until he's dead. If you don't have it, shoot him rapid fire. Don't even bother charging up your Mega Buster. And when he makes it rain, slide away from Cloud Man. Listen for the sound cues and jump over the lightning. Congrats on beating Cloud Man!
Forgotten Factory: Junk Man[]
It is recommended to do this stage after any of the three others, as all of their weapons help. It's a factory full of junk. There are a ton of cockroaches, Danger Wrap is useful in throwing one into another. With the nests, just barrage them until they are destroyed, and this will catch the roaches. One of the Plates is hidden in a secret area behind the lava/slag stuff, underneath one of the cockroach nests. Use Freeze Cracker to find it.
If you do not go for the plate, you will have to deal with a tall vertical area and a bunch of Spiral Gabyoalls. If you only have Freeze Cracker, just try and shoot them when they're lose. With Danger Wrap, shoot them with it, it's the only thing that can kill them. Thunder Bolt is optimal, as you can use it to power up a device that will allow you to ride a block and obtain Rush Jet at the top. You can infinitely farm pickups off the scraps on chains in the area with the junk snakes, which can be very useful if you need to farm up bolts later on.
As for Junk Man, just shoot him with Thunder Bolt and dodge the junk until he dies. Otherwise, good luck.
Robot Museum: Mid Stage[]
This is a short stage. You'll beam in. Do you notice the Brain Breaks in the background? Anyway, head right, noticing the Mono-Roader on a plaque. You'll be in a containment room. You can see Snake Man, Heat Man, Blizzard Man, Pharaoh Man, Flame Man and Plant Man in the background. Notice the shattered capsule. Hmmm... is this what Wily came here for? Anyways, there are no stage enemies, so proceed to the gates. After the 2 gates, you'll enter a room with some capsules in the background. 2 are shattered, and the other ones containing Ring Man and Skull Man. Anyway, you'll see Wily in his UFO, carrying Guts Man in a claw. So the Mega Man Robot Masters were mass-produced!? Anyway, he'll escape with Guts Man, making a hole in the ceiling. You'll see Guts Man later... Before you can chase him, a jester robot, named Mash, will appear to fight you. Mash is very simple. All he does is jump around, trying to crush you. Notice how his head spins around when he lands. Shoot his head and it will come off. It will rebound a bit(it can still hurt you), while Mash's body blindly jumps around. If Mash's body lands where his head is, he will put it back on. So before that happens, encase the head in Danger Wrap. The bomb will cause Mash to get hit. Keep repeating this and Mash will be defeated.
NOTE: Mash's defeat pose varies, unlike the Robot Masters and fortress bosses. You can deliver the last blow to him when he is jumping or standing still.
Next four Robot Masters[]
After you beat Mash, you'll teleport back to Dr. Light's lab. He will tell you that Wily has sent out 4 new robots that are causing havoc. You'll beam out. At the stage select, the mugshots of the new Robot Masters will be added. Choose Slash Man first.
Jurassic Jungle: Slash Man[]

Slash Man's stage
From the start, head right and meet your first enemy in this stage, a stegosaurus robot named Mechastego. Shoot it in the head until it explodes, then head right to an area with waterfalls. Jump on the logs to cross the waterfalls, but be careful not to stand on them too long, as they drop. After you cross the last waterfall, head right and destroy the Arrow Birds and the Mechastegos and head up the ladder. Use Danger Wrap to get rid of the Spine, then climb up the ladder.
Boyoyon Paradise: Spring Man[]
| This section requires expansion. |
Auto's Hyperbolt is in this stage. In the open section, go up from your starting point and turn one of the punch blocks towards the wall.
Mystery! The Horror!: Shade Man[]
Shade Man's stage is full of zombies and crows in the beginning. In the sub-boss, VAN Pookin, you can open two paths depending on how you attack it:
- If you attack the outer pumpkin, it with open a path forward
- By hitting the small inner pumpkin it will open a path below.
It's possible to find the Energy Equalizer and the Proto Shield in his stage. To take the Energy Equalizer, the player has to take the higher path in the sub-boss room. It can be found by using Rush Search below Wily's portrait. The Proto Shield can be obtained by taking the lower path, but first the player has to find Proto Man and fight against him.
Champ of The Roads: Turbo Man[]


Turbo Man's stage
| This section requires expansion. |
Wily Castle[]
Wily Stage 1[]
- Part one: Outer walls: Rooftop
From the start, head right into the outer walls. Take out the Arc Cannons and jump over the pits, watching out for the Thunder Tellys. After that, you'll go into a platform riding area. You can skip it with Rush Coil, though. Climb up the ladders to enter the second area.
- Part two: Blackout zone: Tower
You will be in the first part of a blackout zone. Boufoohs populate this area. Destroy them and jump over the pits, while keeping in mind that the lights turn off at certain spots. At the end, slide under the wall and go down the ladder. In this room, defeat the Wheel Totem and use Rush Coil or Super Adapter to cross the spike pit. Now, you'll be in a long platform room. Use Rush Jet here. Climb up the ladder and enter a short blackout session. Use Super Adapter here. Climb up the ladder, ignore the Energy Tank and enter the door to enter the Awakening Lab and face Bass. This time, Bass has a new attack: his own skull-shaped Charge Shot. Attack him with Charge Shots until he teleports out. Enter the door and head right, destroying the Spyroaches and the Spyroach Nests until you reach and enter the gate to enter Ruined Lab. Guts Man will reappear, but this time with tread legs and a large claw arm, and now with a "G" tagged on to his name. Guts Man G has a few attacks. In one attack he dashes at you and throws you at the ceiling. Another attack has him stomping the ground to make the ceiling lower a bit (don't worry, it won't crash down all the way) and throws a large boulder at you. It's risky, but you can bat the bolder back at him with Slash Claw. Use Slash Claw and aim for his head. Enjoy the awesome fortress boss death animation.
Wily Stage 2[]
- Part one: "Turtle hall: Data area"
- Part two: "Fire zone: Computer hall defenses"
| This section requires expansion. |
Wily Stage 3[]
- Part one: "Inner keep: Factory"
From the start, head up the ladders, taking out the Arc Cannons.
- Part two: "Split defenses: Spike gorge and waterway"
If you take the top path, you'll be in a spike gorge. Here, you'll have to cross a tricky stretch of Disappearing Blocks over a large spike pit. If you get to the end, you'll find an Energy Tank, a Weapon Tank, and a very rare S-Tank! Drop down, kill the Mechastego, drop down again, and you'll be at the boss gates. However, if you took the lower path, you'll be at Waterway. Drop down, avoiding the spikeballs, and once you hit the bottom, head right, killing the snorkel Mets, carefully jump over the spikes, and enter the miniboss gate to face a G-Crowu. Destroy it like the one in Burst Man's stage, then you'll head up. Avoid the shapes made by the spikeballs and you'll reach the top. Climb the ladder, kill the Spine, then slide through the top passage to get an E-Tank, and slide out of the passage. Enter the gates to reach Infinity Walkway. You'll head to the right and a giant Oni Mask robot named HannyaNED² will drop down and the battle starts. HannyaNED² will be constantly chasing you on the bridge, so keep ahead of it! HannyaNED² has some attacks, like missiles, where it fires some missiles which you can stand on. It will also use bombs, where it opens it's "drums" and flings some round bombs out that explode when they hit the ground. Avoid them. HannyaNED²'s third attack is a laser, where it fires a laser out of the green gem on its head that sweeps the floor.
Final Wily Stage[]
- Part one: Teleport System
This is the classic stage where you fight the bosses (now in four floors), use their weaknesses (not in order):
- Burst Man: Freeze Cracker (recommended, shot to the ceiling), Scorch Wheel
- Cloud Man: Danger Wrap (catch him again before he thunderbolts you)
- Junk Man: Thunder Bolt (only avoid the junk throw)
- Freeze Man: Junk Shield (recommended, try to touch him only), Scorch Wheel
- Slash Man: Freeze Cracker (recommended), Scorch Wheel
- Spring Man: Slash Claw (avoid spring punches)
- Shade Man: Wild Coil (charge before otherwise it's useless), rocket punch (adaptor)
- Turbo Man: Noise Crush (charge before by reflecting, avoid his crash)
The upgraded adaptor is recommended for most, except Burst Man: it brings back the fist with a BOMB.
- Wily's Final Arena
When you defeat them all, enter the lowest capsule, and you'll appear on a room with some items. Catch them all, and jump in the pit. You must fight a... bone-legged skull machine, Wily Machine 7. It jumps and releases two small though annoying réplicas. Use charged shots, slide to dodge, and unless you have a turbo controller (for rapid shot obviously), jump above the micro-machines; repeat until you win.
Now for the REALLY HARD battle. The Wily Capsule appears and fires FOUR orbs, that HOME TWO TIMES at you, randomly choosing between: fire, that stuns, burns you and damage six units; ice, that freezes and allows Wily to attack with sparks and damage seven units; and spark that causes four units of damage; after this Wily disappears to reappear in another place. If you wasted at least a E-tank, you may be MINE. Use slide, super adaptor (rocket punch and jet) or freeze cracker for easy hits and avoid, or charge wild coil and try to hit him. if you have the shield, you CAN block the spark shots, the spark orbs are the BETTER option to be HIT.
If you defeat him miraculously, watch his machine explode, his fall and claim for mercy. Mega Man says that he doesn't trust him and charges his shooter for... eventually the fortress begins to collapse, Bass's dog comes, and leaves with Wily, then Bass appears and says that they shall return. He leaves, and then Mega Man too.